
Welcome back to part 2!
So Part 1 discussed why you should place a premium on improving your conditioning during this lockdown. Today we are going to get the ball rolling on HOW you can achieve this.
To be honest, this is the easy part! All you need is a basic grasp on how the body repsonds and adapts to stress (click here to read about stress) and why you need structure, consistency and a programme to follow (click here to read more on this).
Once you have a basic handle on the above, you should know that improving your conditioning is all about energy and stress MANAGEMENT. Put simply, if you keep stacking stress on top of stress, your conditioning levels will decline. Conversely, if you do not apply enough stress, you conditioning will not improve. It’s all about hitting the sweet spot to allow the magic to work! This is why it’s important to know what methods to use each session and how to use them! This is where we feel we absolutely excel at Tier 1 Training and Rehabilitations Systems – we consistently hit that sweet spot with our clients.
And this is the point of today’s discussion! We are going to share some of the methods that we employ with our athletes and general population clients. Better yet, the methods that we are going to share can easily be performed during the current lockdown!

Before we continue however, a huge shout out to Joel Jamieson. The vast majority of the methods we employ at Tier 1 stem from Joel and his work. If you are serious about your sport, your conditioning or a keen reader, Joel is simply the man! We strongly recommend you check his work out!
So where do you start with improving your conditioning?
Well, quite simply, for the vast majority of us. You need to improve your ability to work using Oxygen. This is by far and away your most efficient and sustainable means of energy as working with oxygen does not come at the cost of fatigue. The system that your body uses to work with oxygen is called your Aerobic System. The other 2 systems that your body calls upon are labelled together as your Anaerobic Systems. These 2 systems work WITHOUT oxygen to provide you with energy but this comes at the cost of FATIGUE.
Put simply, your body calls upon the Anaerobic Systems when your body passes a threshold in which the Aerobic System can no longer use oxygen efficiently enough to provide you with the energy you need. This threshold is called your Anaerobic Threshold. All of this tends to occur during exercise that is prolonged or increasing in intensity.
Once you exceed your Anaerobic Threshold, you start to accumulate fatigue. Your rate of fatigue is determined by how long or how far you delve beyond it. Smash beyond it like a bull in a china shop and you’ll be on your knees gasping for air in minutes. Creep beyond it and stay there for a while and fatigue will creep up on you!
Now, here’s the important part. Those of us with a higher level of conditioning, have large aerobic systems and a high anaerobic threshold (meaning they can produce more power using oxygen). Additionally, we tend to manage energy very well at rest which is represented by a lower resting heart rate (RHR). Now, due to having a lower RHR and a higher ceiling point for the aerobic system, there is a much wider window in which you can use oxygen (IE the aerobic system is widened at both ends of the scale (resting and exercising). This is called your Aerobic Window and those of us with good conditioning have a larger window.

Conversely, those of us with poorer levels of conditioning have smaller aerobic systems, lower anaerobic thresholds and and a higher RHR. This means we are not as efficient with oxygen, are under more stress at rest and have a smaller aerobic window.

Now it should come as no surprise to you that individuals with poorer levels of conditioning are the ones who fatigue more quickly. What you may not know however is all of the other negative issues associated with poor conditioning levels such as increased levels of inflammation, illness, injury, disease, issues with mood, sleep disorders, increased sensitivity to pain and so forth. It really does pay to improve your conditioning!
The GOOD news however, is that you can ALWAYS improve your conditioning!
And you are now going to learn HOW!
Number 1 – Lower your Resting Heart Rate.
The way you achieve this is two fold. You want to improve both the size of your heart and the strength of your heart.
In our opinion, you should always start off aiming to increasing the size of your heart first. The reason for this is simply, the training methods that allow you to achieve this operate at a much lower intensity and are therefore much more easy for you to achieve.
Better yet, there is enormous health benefits associated with these methods. These include boosting your immunity to viral and bacterial infections, boosting immunity, lowering blood pressure and reducing inflammation in the body.
By increasing the size of your heart, you increase stroke volume and cardiac output. What this means is your heart is able to pump MORE blood every time it beats. If your heart is increased in size, it is able to fill with more blood before it pumps it around the body. This means that your heart will have to beat LESS times per minute to pump the same amount of blood around your body.
This means your heart is MORE efficient and under LESS stress, especially at REST. This means you will see a reduction in your RHR.
Our go to method to achieve all of this is known as Cardiac Output Training.
Cardiac Output Training.
The goal of cardiac output training is to improve the size of your heart, reduce your RHR and improve your ability to recover more quickly from exercises at higher intensities.
In order to increase the size of your heart, you have to allow it to completely fill with blood each time it beats in order to cause a “stretch effect” upon it. This will ensure that the heart undergoes an adaptive process to make it increase in size. In order to achieve this, you need to train at low to moderate intensity. If you operate at an intensity that is too high, the heart will start to pump faster meaning it will not completely fill with blood and you will not get the effect that you want.
To be sure that you are operating at the right intensity, a heart rate monitor is ideal. A chest strap heart rate monitor is perfect but if you have a wrist based heart rate watch such as a garmin, this is still relatively reliable.
The zone that you need to exercise in is between 120 and 150 beats per minute. This ensures your heart is able to fill up between each beat. If you are a fitter individual, you can narrow this range to between 130 and 150 and if you are older or just starting out, you can also narrow it to between 120 and 140. If you do not possess a heart rate monitor, just operate at about 6/10 max effort continuously (you should be able to still hold a conversation throughout).
In terms of exercises, pick anything that is “cyclical” in nature. This means, walking, cycling, slow paced jogging, rowing, stepping or throwing. You can pick one exercise for the entire duration but we recommend mixing up the exercises to reduce boredom and repetitive stress on joints etc for those of you starting out (e.g. 5-10 mins per exercise before swapping).
In terms of duration, anywhere between 20 and 90 minutes is the official guidelines but we recommend starting at 30 minutes and adding 5 minutes per week until you hit around the 50 minute mark. Only athletes really need to go beyond that.
And that’s it! Stick to 120-150bpm (or 6/10 effort), keep it cyclical and start at 30 minutes to begin with! Easy peasy!
Want to see an example of Cardiac Output Training? – CLICK HERE
Aerobic Tempo Intervals.
Aerobic Tempo Intervals are an incredibly powerful active recovery method. Better yet, they require no equipment for runners or just a bike if you wish to perform them this way. They are also incredibly easy to perform.
Tempo Intervals are an aerobic based form of training that utilise short intervals (10-15 seconds) followed by a longer period of active recovery. Due to Tempo Intervals being an aerobically driven exercise, the key is to operate at only 70-75% of your maximum intensity/speed. This ensures no accumulation of fatigue.
For Running & Biking operate at 7/10 (or 70%) of your max speed!
The science behind tempo intervals is to utilise the recovery properties of the aerobic system. By performing short aerobic intervals, you drive fresh, oxygenate blood around the body which helps to get rid of any fatigue in the body. Secondly, by operating with short duration, aerobic natured activity, you BOOST recovery by shifting the state of your nervous system into recovery mode. Both of these benefits add up to reduce fatigue, speed up recovery and make you feel GOOD! They are a great addition to any training session as they enable you to training for longer without ever having to worry about doing too much.
How to Perform Aerobic Tempo Interval Training.
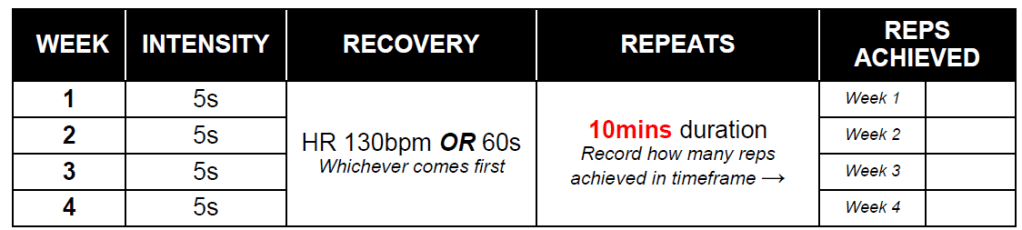
The key to successful tempo interval training lies within 4 things. Their intensity, their duration, their number of sets and the amount of rest.
In terms of intensity, you should always ensure that your intensity lies at around 70-75% of your maximum speed or power output. In terms of duration, anywhere between 10 and 15 seconds is effective. In terms of number of sets, work up to anywhere between 8-20. Regarding rest, choose active recovery such as very gentle walking or pedalling.
If using a heart rate monitor, elect for a heart rate recovery to 130bpm. If opting for time based recovery choose 40-60 seconds of time based recovery as this will ensure you stay aerobically focused and prevent any risk of delving into fatigue. You can also opt for the superior and combined approach of heart rate recovery and time. By this we mean, whichever comes first, 130bpm or 40/60 seconds.
For an example of the Aerobic Tempo Interval Method – CLICK HERE
Number 2 – Improve the ability of your muscles to work with oxygen
A common misconception with conditioning is that it always has to involve either really intense intervals or long boring activities. As a result of this people always jump to the mindset of:
“I need to be running, cycling, cross training or swimming!”
The truth is, effective conditioning can also involve activities that require only a few minutes of time. Conditioning can also involve resistance training. This includes The Tempo Lifting Method.
The Tempo Lifting Method.
Just like your heart and lungs can be trained to improve your ability to work with oxygen, so can your muscles. You may be familiar with the fact that muscle fibres can be divided into “fast twitch” and “slow twitch”. Fast twitch fibres provide a muscle with the ability to contract forcefully and at speed which inevitably enables power and explosiveness. Slow twitch fibres enable a muscle to contract repeatedly at lower intensity as they are able to work well without oxygen. This enables endurance and resistance to fatigue, unlike the fast twitch fibres which demonstrate increased rate of fatigue.
The reason why is simply because fast twitch fibres are largely anaerobically driven, whereas slow twitch fibres are more aerobically driven. Now everybody is different but we all have a combination of slow and fast twitch fibres in our muscles. If you want to improve your conditioning, it is important to train both.
Now if you want to improve your aerobic conditioning, it is important to improve the ability of your slow twitch fibres ability to work with oxygen to reduce fatigue. It is also important that you improve the ability of your fast twitch fibres to RESIST the effects of fatigue for longer. The good news is that once again, fast twitch and slow twitch fibres are both highly trainable and can be vastly improved. The GREAT news is BOTH can be trained to improve their efficiency with oxygen to become more fatigue resistant.
The Tempo Lifting Method is a training method that focuses on the slow twitch fibres. It is designed to improve their ability to work both with oxygen by increasing their size and the number of cells called mitochondria within them. Mitochondria are basically little power plants within muscles that utilise oxygen for energy. The more mitochondria there are, the more the muscle can work and recover. Perfect for someone who wants to improve their aerobic conditioning!
How to perform The Tempo Lifting Method.
Tempo lifting is very simple to perform. The key is to pick an exercise that involves a large number of muscles so that you can work on improving a vast number of muscle groups and slow twitch fibres in one hit. This means choose to perform squats, split squats, press ups and rows, as between them they cover the entire body.
The second important concept to grasp is to perform them SLOWLY. This ensures you target the slow twitch fibres! Finally, make sure you apply constant tension to the muscle groups that are working! This means you should never lock out your joints (e.g. do not lock out your knees or elbows when squatting, pressing or rowing).
The slow tempo needs to tick around the 3-0-3 (or 2-0-2 for beginners) throughout. This means throughout each exercise, you lower for 3 seconds and then squat up, push up or row up for 3 seconds. There should be no pause in between.
To begin with, perform 3 sets of around 8 repetitions per exercise with around a 60 second rest period. To progress, you can progress to 3 sets of 10, 4 sets of 8 or 4 sets of 10. You can also drop the rest period to 40 seconds to make it more challenging and progress your conditioning.
Due to the slow, controlled and aerobic nature of these exercises, they impose little soreness and fatigue on the body. Therefore they are a great compliment in any aerobic conditioning programme and do little to increase any risk of overtraining.
To see an Tempo Lifting Examples Click on the following:
Number 3 – Improve the ability of your fast twitch muscles to resist fatigue
If the Tempo Lifting method targets your slow twitch fibres ability to work with oxygen. You need a conditioning method to target the fast twitch fibres ability to resist fatigue.
There are a number of training methods that allow you to achieve this. The main ones that you could adopt at home or outside are:
- High Resistance Intervals
- High Intensity Continuous Training
- The Explosive Repeat Method
- Alactic Intervals
High Resistance Intervals.
The concept behind these intervals is to utilise high resistance (in the form of gravity, inclines or load) to work against. The increased resistance does nothing to detract away from your power output, but it does affect the speed in which you can operate at.
In essence, HRI’s utilises low speeds with high resistance to improve the oxygen using capabilities of your fast twitch fibres. This increase retains and improves their power whilst significantly increasing their endurance
The beauty of these intervals lies in their simplicity. To perform this method of training in a lockdown, all you have to do is find a steepish hill and aim to flat out sprint for the entire duration of the rep, recover and repeat! Sometimes you just can’t beat the old school methods!
Repetitions need to be kept very short and typically last anywhere between 5-7 seconds and then allow for a period of rest of around 45-90 seconds to start with. This can be spent walking back down the hill and gently around to encourage more active based recovery.
You can wear your heart rate monitor when performing HRI’s as this enables you to have an alternative rest period over seconds. If you want to use your heart rate monitor to gauge your rest period, you simply rest until your heart rate dips back to around 130/140 beats per minute before going again. Typically, a conditioning session consists of 8-20 reps depending on your fitness level.
High Intensity Continuous Training (HICT).
The key with HICT lies in its name. The name of the game is to operate with high intensity (speed/explosiveness) to ensure that you exclusively target the fast twitch fibres. Secondly you need to operate continuously to ensure you are adding an aerobic element to the exercise. This serves to ensure that the fast twitch fibres have to improve their relationship and efficiency with oxygen.
Our top home method of HICT is Sprinter Step Ups.
We love to utilize sprinter step ups from a standard 30cm box/step whilst wearing a weighted vest. This is an excellent form of HICT training as it targets all the major lower muscle groups (Glutes, Quadriceps, Hip Flexors, Hamstrings and Core). The combination of the weighted vest and the height of the box are sufficient enough to ensure that during high intensity, all of the fast twitch fibres are recruited.
That said, as we are in lockdown, you can improvise by placing some items in a rucksack and wearing it back to front so that it sits in front of you.
HICT ideally requires the use of your heart rate monitor. The key is to operate in the heart rate zone of anywhere between the 150 to around the low 160’s beats per minute. However, if you do not possess one, simply look to perform each step up with max intensity and then pause for a 1-2 second count in your head before performing another step up at max intensity on the other leg (this should get you thereabouts with intensity).
To perform HICT, you must operate with maximum intensity on the step up phase. You must perform this with explosiveness to recruit the fast twitch fibres. Then simply reset, pause very briefly and repeat (perform another high intensity step up and so forth). All you must do is repeat this process for the set time which progressively increases week by week (usually from around 7 minutes anywhere up to 20 minutes). If performing multiple sets, you must include active recovery of around 3-5 minutes at around the 130bpm mark. This can include walking, skipping, gentle cycling etc.
One thing we will say about HICT is: GET… READY… TO… SWEAT!
This type of training will get your skin leaking like no other so have some towels at the ready!
Click here for an example of HICT
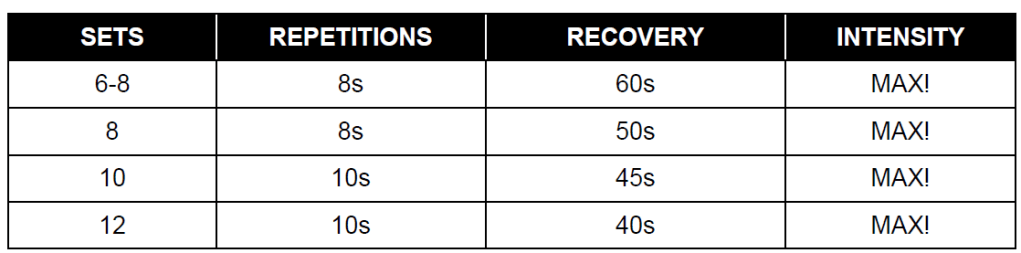
The Explosive Repeat Method.
First things first, the explosive repeat method is to be performed with 100% maximum effort/intensity. There are no half measures or pacing allowed. The name of the game is to remain 100% explosive throughout the entire duration of each repetition. Repetitions typically last between 6-12 seconds. Active recovery periods usually start out at around 60 seconds. The sets usually start off between 6-8 per exercise but in advanced athletes can range much higher and can be less in beginners.
As each week progresses, the idea is to increase the duration of each working repetition whilst reducing the duration of the rest periods. Secondly, its common to increase the amount of sets performed too. This ensures that your fast twitch fibres are challenged to improve their aerobic capabilities and power output whilst your slow twitch fibres are challenged to adapt better at recovery from high intensity efforts.
In terms of exercise selection, we advise more general based exercises like jump squats kettlebell jump squats, broad jumps and explosive push ups. However we will add that this is an advanced method and requires an underlying based of strength. So if you are new to all of this, we strongly advise a solid period of tempo lifting and HICT before utilising this method.
Click here for an example of Explosive Repeat
Alactic Intervals.
These high speed, higher power output intervals are fantastic. They are extremely versatile as all they require is a short burst of maximum power and effort followed by a longer period of active recovery before repeating. They are essentially max effort spints.
This means you can use any method you like, you can perform outdoor sprints, bike sprints or indoor band resisted sprints which require little room.
Generally speaking start at around 5 or 6 second sprints followed by 60s rest periods. Each week, add 2 seconds to each rep and knock 10 seconds of each rest period. This will dramtically improve your fast twitch fibres as well as your have a small, positive effect on your heart strength, all of which greatly improve your conditioning.
Number 4 – Raise your Anerobic Threshold
Anaerobic Threshold Training.
The final piece of the jigsaw in your Home Conditioning is Anaerobic Threshold Training. The name of the game with this method is to raise the ceiling in which your aerobic system can work with oxygen and thus, provide you with sustainable energy. This means you will be able to work for longer and harder without fatigue. This will make you more resilient in exercise and in life.
Before you start this type of training however, you WILL need access to a heart rate monitor. You also need to know roughly what your threshold is. If you are an endurance athlete, chances are you already know this figure. If you have a Garmin or Polar watch, it will have worked out a rough guesstimate for you already.
If you do not know it, you can do something called a 12 minute cooper run but this is a bit complicated during a lockdown so here is a 30 second formula that you can use:
Find your theoretical Max Heart Rate:
211 – (0.64 x Your Age)
Find your theoretical Anaerobic Threshold:
If you are an active individual: Times your theoretical max heart rate figure by 0.85
If you are a sedentary, non active individual: Times this figure by 0.75
EG = Theoretical Max Heart Rate for an active 35 year old = 211 – (0.64 x 35) = 188.6
Theoretical Threshold = 188.6 x 0.85 = 160 beats per minute (Subtract another 5 beats if you are to use cycling as your training method).
Once established, the key is to hit the zone of your threshold (a good starting guide is to stay just under or over your threshold by around 5 beats per minute and stay there for the duration of your allocated time. In terms of exercise selection, keep it simple with running or cycling outdoors or if you have an indoor bike or treadmill, have at it!
In terms of duration, you need to allocate a training period of around 1 hour. Within this hour you are looking at anywhere between 3 and 30 minutes per repetition depending on your level of conditioning or sport.
We recommend a good starting point is around 4 sets of 6 minutes or 8 sets of 3 minutes. You will also need to perform active rest periods that typically last around 3 minutes and should be spent walking or very low level pedalling. To progress over a 4 week period, simply add 1 minute to the working period each week if using the 4 x 6 method OR if using the 8 x 3 method, add 1 minute to the working period each week and remove a set.
We also recommend using active rest that lowers down to around 120-130bpm. Additionally to all of this, where possible, ensure that you are recording the distance covered each session as this should demonstrate improvements in your power output whilst at threshold.
Remember, the key is to get up to your threshold and stay there or thereabouts for the entire duration of each repetition. If you don’t push its boundaries and impose a specific demand for it to need to improve, it will not improve.
And that’s it! 4 simple steps to dramatically improve your conditioning in life & sport!
All you have to do now is learn how to organise them so that you know WHEN to use them!
That comes in PART 3!
Thank you so much for reading!
Stuart Turner
stuart@t1trainingandrehab.co.uk

2 thoughts on “The Best Conditioning Methods to do during Lockdown.”